
 close
close


 LOGIN
LOGINYou are viewing 1 of your 1 free articles
Masterclass ankle instability Part III: post-op rehabilitation


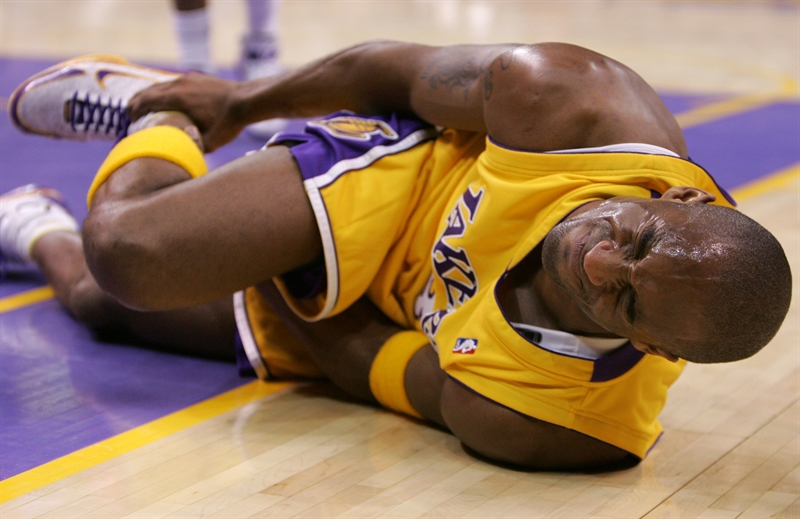
Ankle sprains in athletes account for a large amount of time away from competition(1,2). Its prevalence as a joint injury may be as high as 20% of all joint injuries suffered by athletes(3).
Most ankle sprains tend to recover well to a functional level with conservative rehabilitation. However, a number of acute ankle sprain sufferers may go on to develop later-stage chronic or recurrent ankle instability, with a feeling of ‘vulnerable ankles’, episodes of catching and ongoing pain - and further episodes of repeat ankle sprains(4). Of further significance is that ankle sprains have a high rate of recurrence (as high as 80% in high-risk sports)(5,6). This suggests that many ankle sprain sufferers will most likely sprain their ankles again, and this may then cascade to late stage chronic ankle instability (CAI).
Part one of this series discussed the pathological progression from acute ankle sprain to chronic and recurrent instability, the relevant anatomy and biomechanics that are involved in this syndrome, how it may be identified in the athlete and options for management. Part two discussed in detail the surgical options available to stabilise an ankle with CAI. The argument for anatomic repair was discussed in detail. In the final part of this series, we will consider post-op rehab. In particular, the multi-stage protocol will be presented and particular reference will be made to how the programme differs for an anatomic repair (Brostrom, modified Brostrom or Gould repair) versus the non-anatomic repair (Chrisman- Snook, Colville or Evan repair).
Post-operative rehabilitation protocol
As with any planned rehabilitation protocol, an understanding of the influence of load exposure, load attenuation and force generation is critical to provide a clear understanding of the milestones that need to be achieved in the post-surgical ankle, and the rate at which these milestones can be pursued. As always, the best way to approach the process is to stage the approach to high performance and load resilience using a ‘phased’ or ‘milestone-based’ strategy, with each stage feeding into the next. In keeping with the exit-criteria approach, we do not move between stages according to the passage of time, but the accomplishment of functional goals. The four primary stages of ankle rehabilitation following an anatomic or non-anatomic reconstruction are:- Stage One: Protection and healing (see table 1);
- Stage Two: Restoring muscle strength and range of movement (see table 2)
- Stage Three: Integrated functional adaptation (see table 3)
- Stage Four: Sports-specific retraining (see table 4)
| Key objectives | • Protection of the post-surgical ankle• Eliminate swelling and oedema (using cryotherapy, electrotherapy, compression devices)• Independence with transfers and mobilisation with crutches |
| Precautions | • Either supported in plaster of Paris backslab, or hinged Aircast boot (see paragraph below*)• Non-weight bearing (NWB) or graduated partial-weight bearing (PWB) per surgeon’s instructions for the first 6 weeks (see paragraph below*)• No driving |
| Range of motion | • Active dorsiflexion (DF) and plantarflexion (PF) only and within brace from weeks 3-6. No passive ROM allowed in first 6 weeks |
| Exercises | · Abdominal isometrics· Planks from knees· Quadriceps sets/straight leg raises· Leg lifts for hip strength (prone and side lie)· Toe exercises for circulation· Unrestricted upper limb gym work |
| Cardiovascular exercise | • Seated boxing• Arm grinder• 1-leg rowing with leg on scooter board• Upper body circuits• Swimming (with pool buoy - no kicking) once wound has healed |
| Exit Criteria | • Patient may progress to phase II if they have met the above stated goals and have:1. Safe gait with crutches2. Reduced swelling and effusion3. Independence with transfers |
(*)Although post-operative protocols vary with the type of repair, a standard Brostrom/Gould reconstruction is usually fully weight bearing (FWB) in Aircast Boot fixed in a neutral position for the first two weeks. During weeks 3-4 the brace is locked at 10 degrees of dorsiflexion and 20 degrees of plantar flexion. During weeks 5-6 the brace is opened to 20 degrees DF and 40 degrees of PF. At 6 weeks, the patient is FWB and allowed to mobilise without boot. However, if the patient remains tentative, it is common to maintain use of the Aircast boot when outdoors and to use an Aircast stirrup indoors.
In the non-anatomic repair, patients may be partial weight bearing (PWB) in plaster of Paris (POP) for four weeks with foot in neutral position and then full weight bearing (FWB) in POP at 4-6 weeks. Once out of POP at six weeks, they are usually transferred into an Aircast walker FWB for a 2-week period. There is no active eversion for the first six weeks. The non-anatomic repairs are typically slower to progress than anatomic repairs due to the complexity of re-routing tendons to support the lateral ankle. Note that the above protocol may be delayed and adapted if the patient has also undergone osteochondral repair (if such a defect occurs due to the nature of the CAI).
| Key Objectives | • ROM 80% on unaffected side by week 12• Pain free gait on even surfaces by week 10 and then stairs and uneven surfaces by week 12.· Oedema control and patient education regarding skin/wound care and prevention of infections· Prevent scar tissue adhesions and avoid myofascial restrictions |
| Precautions | • No passive, active-assisted or active inversion exercises until week eight. Active inversion from week nine. This may be delayed to week twelve in the non-anatomic repairs.• No active assisted or passive stretching into plantarflexion until week eight. Active PF from week nine. This may be delayed to week twelve in the non-anatomic repairs.• Avoid standing or walking for extended periods of time. |
| Range of motion | • Progress active range of PF and INV from week nine onwards in anatomic repairs.• Mobilise to improve dorsiflexion (see below on manual techniques to improve dorsiflexion)• Soft tissue therapy to soleus, gastrocnemius, peroneals, tibialis posterior and anterior |
| Exercises | • Gait drills - begin with pool or Alta G (if available). Progress ASAP to gait on firm surface, with or without semi rigid orthotic support for ankle• If available and pain levels minimal, straight-line running may commence from week ten in an Alta G treadmill or Zero Gravity pool• Functional sagittal-plane, closed-chain movements such as banded terminal knee extension, small one leg squats, small range lunges and small range leg press• Occlusion training (see issue 158) and muscle stimulator on the calves, peroneals, tibialis anterior will be most appropriate at this stage of rehabilitation and can be incorporated into calf raises, calf press and peroneal activation exercises.• Commence hip-dominant program that does not involve ankle dorsiflexion or plantarflexion. Suitable exercises are Romanian deadlifts, straight leg and 45-degree bridges, back extensions, reverse hyperextensions• Controlled peroneal activation exercises with Theraband from week nine (see below). No forced inversion however until week twelve• Balance and proprioception exercises. Unilateral stance: eyes open, eyes closed, external perturbations, foam block, rocker board, ball toss, reaching, star balance excursion (see below)• Intrinsic and extrinsic arch muscle exercises. |
| Cardiovascular exercises | • Standing boxing (no feet movement)• Arm grinder• 1-leg rowing with leg on scooter board• Upper body circuits• Deep-water running with ankle support• StairMaster• Elliptical• Treadmill walking• VersaClimber |
| Exit criteria | • Range of active movement. Knee to wall 80% of unaffected side. Pain-free, full-range active PF and INV• Normal gait on even and uneven surfaces• Good pelvis/hip control with 1-leg squat movement• Single leg balance greater than 15 seconds |
Star excursion balance test
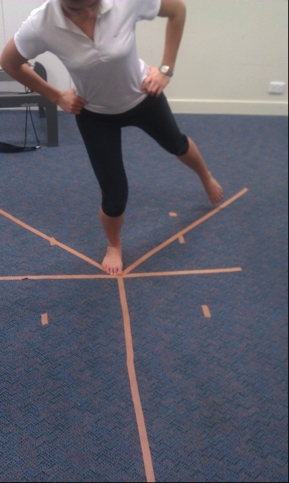
An accurate and reliable functional balance test is the star excursion balance test (SEBT). This test measures left to right differences in balance, ankle dorsiflexion range of motion and ankle/knee/hip muscle strength. Limitation to movement will be due to one or a number of these factors.This test is performed by standing on the joining lines on the floor. Whilst balancing on one foot, the other foot is reached out and the big toe is used to touch the ground on the line. A mark is made and this is compared to the other side. The test can then be progressed to also touch the oblique lines behind the body in a posterolateral direction and posteromedial direction (figures 1 and 2).
Using the SEBT, it was found that athletes with chronic ankle instability had significantly decreased reach distances compared to the uninvolved limb and to the reach distances of healthy controls(7). The SEBT also requires other neuromuscular characteristics such as lower extremity coordination, flexibility, and strength(8). Furthermore, each reach direction activates muscles to a different extent. Therefore, assessing and retraining in this test is a necessary component of the post-operative rehabilitation for the post-surgical ankle.
Figure 1: SEBT anterior direction
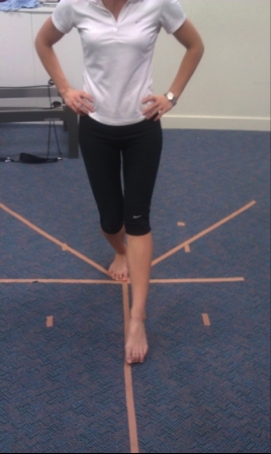
Figure 2: SEBT posterolateral direction
Manual techniques to improve ankle dorsiflexion
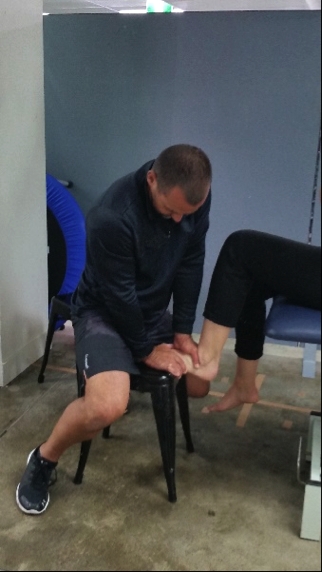
Talocrural mobilizationsThis is the classic Maitland technique for improving talocrural dorsiflexion(9). Grasp the ankle with one hand with the webspace of the hand over the talus. The other hand stabilises the distal lower limb. Lock the ankle into the desired level of dorsiflexion using the thigh. Direct an anteroposterior (AP) mobilization to the talus (see figure 3). his can also be performed with the ankle in dorsiflexion by placing the foot on a chair or stool and having the patient apply pressure on the thigh to maintain dorsiflexion ( see figure 4).
Figure 3: Talocrural dorsiflexion mobilization
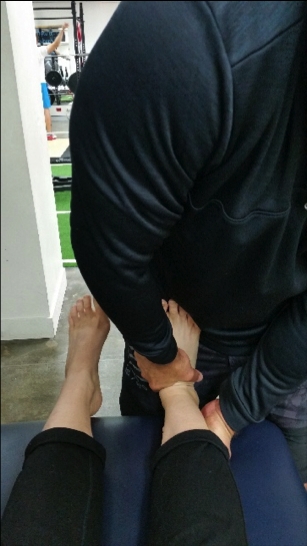
Figure 4: Talocrural dorsiflexion mobilization in weight-bearing
Mulligan seatbelt mobilizations (see figure 5)
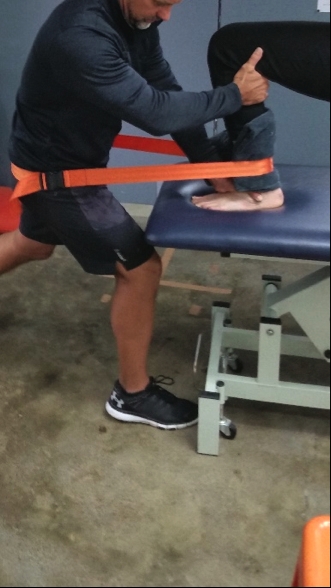
Seatbelt mobilizations were made popular by New Zealand physiotherapist Brian Mulligan(10). For this technique to improve dorsiflexion:
- Position the client on the plinth in 1-knee kneel.
- Place the webspace of one hand against the neck of the talus.
- Position a seatbelt around the distal calf (use a towel to protect the Achilles and calf) and loop the seatbelt around your hips.
- The other hand can be used to support the other hand.
- Ask the client to ‘lunge’ forward into dorsiflexion and at the same time direct an AP glide to the talus.
- Perform this in sets of 10-15 repetitions.
Figure 5: Mulligan mobilisation
Capsular releases
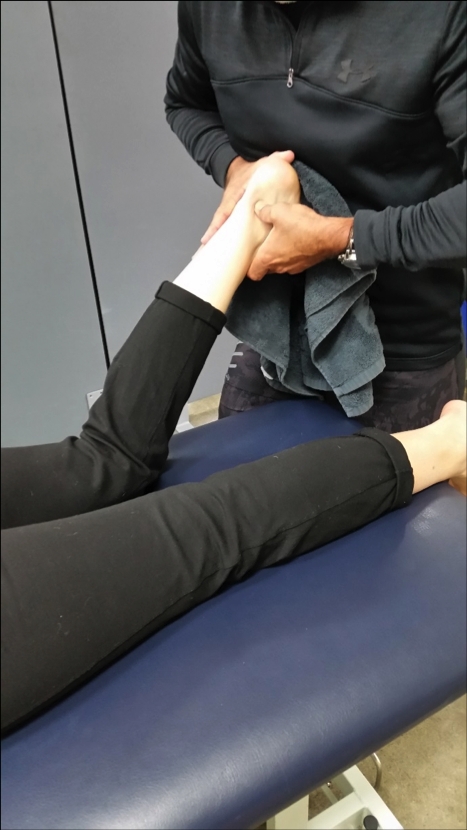
Following a serious ankle sprain where the ATFL has been ruptured or over-stretched, it is common for the talus to be positioned in a more anterior position, as the ATFL no longer restrains anterior talar displacement. However, as the medial support tissues remain intact and the talus cannot slide anteriorly on the medial side, often the talus rotates in an antero-medial direction so that the antero-lateral aspect is more anterior and the postero-medial aspect is displaced posteriorly.
With this, the postero-medial capsule tightens and becomes restricted. Often this will persist even after surgery. A simple manual technique for this is to apply direct pressure to the postero-medial aspect of the talocrural joint and take the ankle into a dorsiflexion movement. This can be done as a sustained pressure or pressure with movement (see figure 6).
Figure 6: Capsular releases
Self mobilization
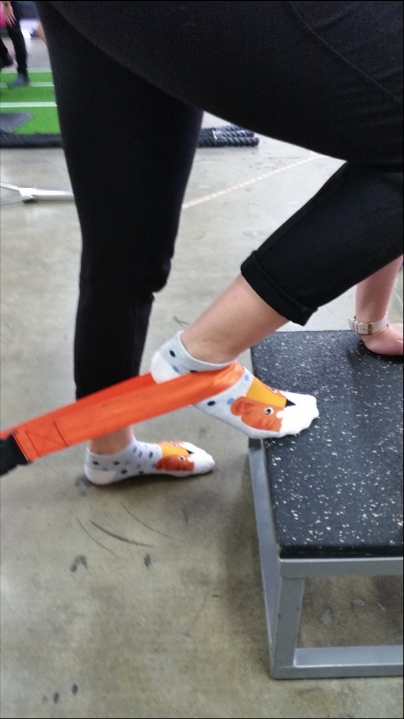
Use a seat belt or luggage belt for this technique. A stretch band will not work. Loop the strap around a post so it is fixed and cannot move. Loop the other end around the neck of the talus (see figure 7). Position the forefoot onto a box or step. Gently take the knee forward to create an upward and forward movement of the tibia in relation to the talus. As the rigid strap fixes the talus with this movement, the talus is pulled into a relative posterior direction and is distracted away from the tibia.
Figure 7: Self mobilization
Peroneal activation series
- Isometric eversion holds
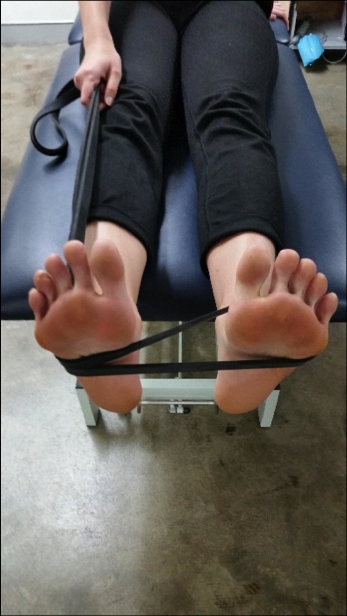
Loop a Theraband or Theratube around the forefoot of the affected ankle. Loop the length around the other foot that now acts as a fulcrum for the Theraband. Keep the working ankle locked in neutral dorsiflexion and eversion. Attempt to pull the legs apart using hip abduction without the ankle position changing. As the band tension increases the peroneals will increase their activation. These can be performed as holds or as through range repeat movements (see figure 8).
Figure 8: Isometric contractions
- Small through-range eversions
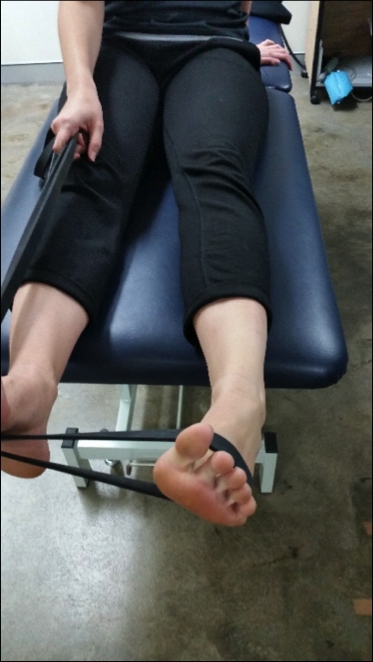
Figure 9 shows an extension of the above exercise, now using ankle inversion and eversion movements. This can safely be started from week nine post-op onwards.
Figure 9: Development using ankle inversion and eversion
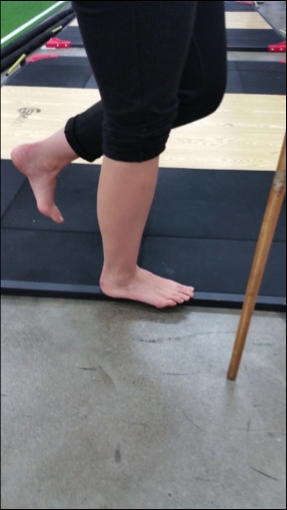
As a further development, stand on a step with the 1stand 2ndtoe and inside of the heel in contact, but the outside of the foot free in space. Hold this as an isometric contraction using peroneals. Repeat for 10 second holds (see figure 10).
Figure 10: Step eversion holds
- Step inversion to eversion exercises
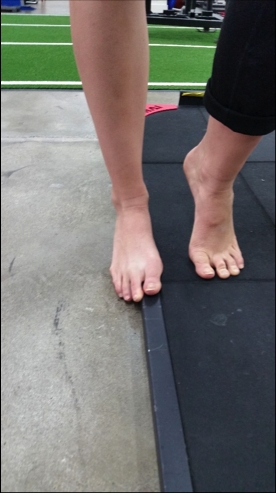
This is a progression from the above exercise shown in figure 10. The ankle can now move from eversion to inversion, being controlled eccentrically by the peroneals. The return eversion is concentric. This is started initially with slow and controlled movement; however this can be progressed to high-speed inversion to ‘catch’ the ankle before excessive inversion occurs. This works the stretch reflex response of the peroneals. It has been shown that there is a delay in peroneal activation during inversion in ankles that have been previously injured, and this most likely represents a motor control deficit in the peroneals(11)(see figures 11 and 12).
Figure 11: Inversion to eversion: start
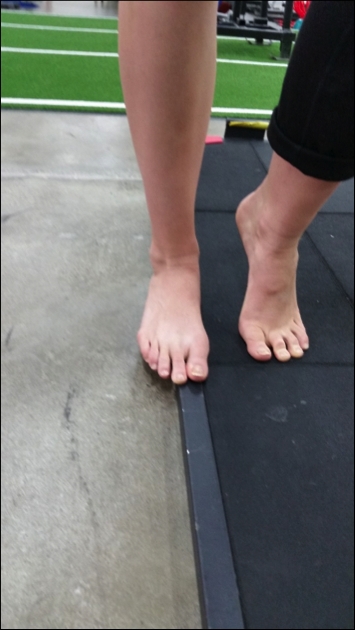
Figure 12: Inversion to eversion: finish
- PNF repeat contractions
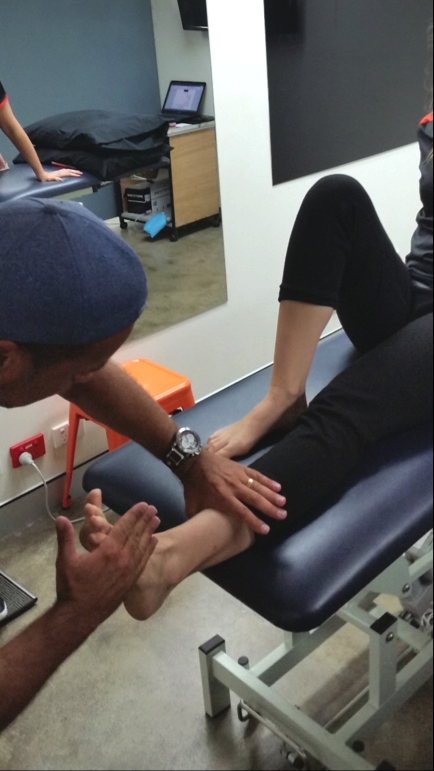
This is a late-stage exercise designed to utilise proprioceptive neuromuscular facilitation (PNF) techniques to improve peroneal latency and activation times. The therapist applies unpredictable and high-speed plantarflexion/inversion movements to the ankle to activate the myotactic reflex of the peroneals. The patient (with eyes closed) needs to withstand these PF/INV forces using perineal and toe extensor muscle activation (see figure 13).
Figure 13: PNF repeat contractions
| Key objectives | • Commence light running drills and progress to sprints.• Integrate non-sagittal plane movements.• Regain calf and peroneal muscle bulk.• Commence light deceleration drills |
| Precautions | • May continue to use protective strapping or brace to ankle for full support and confidence. |
| Range of motion | • Continue active and passive DF, PF, INV, EV to regain full range of motion. If needed, strong physio directed passive accessory glides may be required to regain full talocrural DF/PF, subtalar movement, midtarsal joint movements. |
| Exercises | • Functional sagittal plane closed chain movements such as one leg squats, lunges, leg press and step ups.• Commence Triple Extension drills as a way of re-integration of running mechanics into a loaded strength program (see Patella Dislocation-Part 2 article in issue 162).• Start multidirectional closed chain exercises such as lateral lunges, side step ups and rotational squats.• Progress hip dominant program such as Romanian Deadlifts, straight leg and 45Ö¯ bridges, back extensions, reverse hyperextensions and start hip dominant movements requiring knee flexion such as thrusters, Nordic hamstrings.• High level balance and proprioception exercises. Retest Star Excursion Balance Test weekly.• Start plyometric program from week 12 (see below for progressions).• Change of direction drill start at week 16. By this time they should have progressed to 90% straight line speed. |
| Cardiovascular exercise | • Standing boxing (controlled feet movement)• Stationary Bike• Rowing ergometer• Swimming• Rope skipping• Start running drills and progress to sprints. |
| Exit criteria | • Range of active movement 100%• Single leg balance greater than 30 seconds• SEBT 90% of unaffected leg.• 1.2km running time (90% of pre-injury status) |
Plyometric Progressions (all performed as 3 x 10 reps).
- Bilateral jumps up to 4 inch box, Progress to 6 inch box.
- Vertical jumps for height in place.
- Jumps up and then jumps down from 4 inch box. Progress to 6 inch box.
- Vertical jumps over ladders in series.
- Depth jumps up and down from 8-inch to 12-inch boxes
- Lateral jumping bilaterally over a line
- Lateral jumps up and over a 4-inch box
- Jumps in series in multiple planes.
- Repeat same sequence from 1-8 but with single leg hops.
- Start Cross-Over hop test as an exercise and a test (see Stage 4).
| Key objectives | • Develop maximum concentric and eccentric lower limb strength• Reintegrate sport-specific skills into training• Develop confidence and robustness in the ankle to tolerate sports-related activity |
| Precautions | • May continue to brace with protective strapping for first six months post-operative. |
| Range of motion | • Continue passive manual therapy to regain full range of motion if required |
| Exercises | • Unrestricted sagittal plane closed-chain movements to full range and posterior chain exercises• Progress multidirectional plyometric-type movements as discussed above• Continue high-level balance and proprioception exercises, including sand-based drills and trampoline drills (see issue 158)• Progress change of direction training to full intensity by week 20. |
| Cardiovascular exercises | • Re-integration into full training• Unrestricted boxing/cycling/swimming/rowing |
| Exit criteria | • More than 90% on hop tests and crossover hop tests (see issue 141 and see below).• Full competence and confidence over the course of a prolonged period of competitive training (as reported by coaching and support teams, as well as athlete themselves) |
Crossover hop test (CHT)
Hop tests are purported to more accurately test for post-operative dysfunction than double-leg jump tests as the tests are performed unilaterally and the good leg acts as a natural control leg for measurement comparison. With two-legged jump tests, the uninvolved limb may mask deficits of the involved limb (Myer et al 2011)(12). The values on hop tests are measured as the limb symmetry index (LSI), which is found by:
- Distance hops:(mean involved/mean uninvolved) x 100%
- Timed hops:(mean uninvolved/mean involved) x 100%
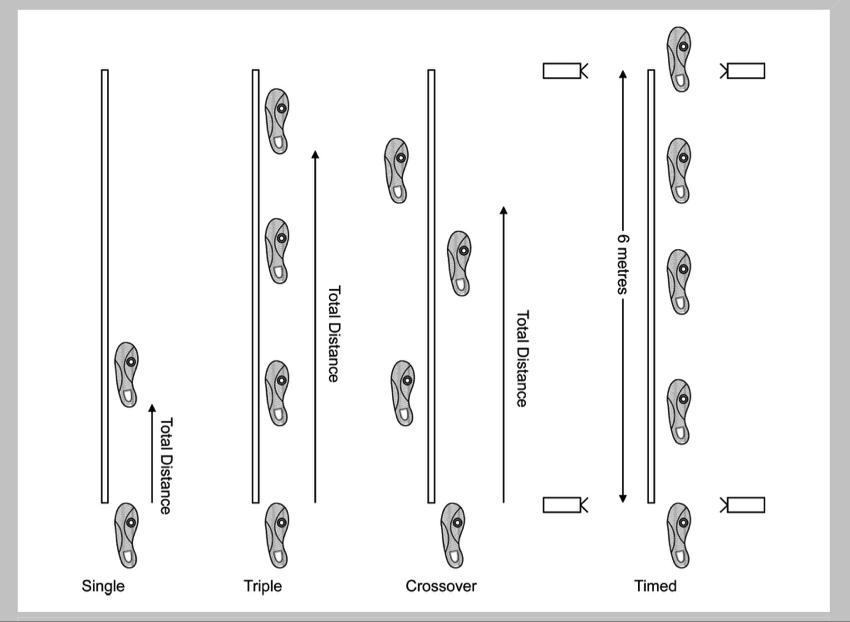
The CHT has been proven to be a reliable test for measuring the dynamic postural control in patients following knee surgery(12). It is possible to extrapolate these findings into assessment of ankle function following surgery for CAI. This test is performed by jumping over a 6-inch rectangle from a standing start followed by three impacts. The last impact needs to ‘stick’ and the athlete must not lose balance. Figure 14 shows a diagram with some variations in distance and timed hop tests. It has been accepted in post-operative knees that 87% LSI is needed to reduce risk of knee injury following surgery(12). For our purposes, the safer level of 90% LSI is used as the level the athlete needs to achieve prior to return to sport. Below is an image that shows the variations in the different hop tests including the cross over hop test.
Figure 14: Variations in the hop tests (including crossover hop test)
Conclusion
Ankle sprains and the possible late-stage outcome of CAI continues to be an area of interest in sports medicine. Ankle sprains are common among physically active individuals, particularly those who participate in court and team sports. Re-injury is also problematic in those engaging in high-risk sports, and this may lead to CAI.The patho-anatomical reasons for CAI are multifactorial and relate to both anatomical deficits that lead to mechanical instability and neuromuscular changes that lead to functional instability (or perceived instability). As a result recurrent sprains may be present. Although most of these are initially managed conservatively, a percentage will fail and require subsequent ankle surgery to stabilize the lateral ankle.
The post-operative rehabilitation following surgical repair of the ankle with CAI is quite extensive for the athlete and this incorporates direct interventions such as talocrural dorsiflexion techniques to improve range of motion, peroneal muscle activation to improve the function of these protective muscle units, as well as frequent functional testing such as the SEBT and hop tests, which will provide the athlete with the confidence and resilience to return to high level sport.
References
- Sports Med. 2007;37(1):73–94
- Am J Sports Med. 1977;5:241–242
- United States Bone and Joint Initiative. The Bone and Joint Decade: The Burden of Musculoskeletal Diseases in the United States. http:// www.boneandjointburden.org/. Accessed November 1, 2013
- Am J Med. 2008;121(4): 324–331, e6
- Br J Sports Med. 2001;35:103–108
- J Athl Train. 2002;37(4):376–380
- J Athl Train. 2002;37:501-506
- J Orthop Sports Phys Ther. 2006;36:131-137
- Hengeveld E and Banks K (2013) Maitland's Peripheral Manipulation, 5th Edition ‘Management of Neuromusculoskeletal Disorders’ - Volume 2. Churchill Livingstone
- Hing et al (2015) The Mulligan Concept of Manual Therapy. Churchill Livingstone
- Am J of Sports Med. 2009. 37(5); 982-988
- J Orthop Phys Ther. 2011. 41(6); 377-387

Latest Issue
Subscribe Today
Newsletter Sign Up
Subscriber Testimonials
Dr. Alexandra Fandetti-Robin, Back & Body Chiropractic
Elspeth Cowell MSCh DpodM SRCh HCPC reg
William Hunter, Nuffield Health
Subscribe Today
Further Reading
Newsletter Sign Up
Coaches Testimonials
Dr. Alexandra Fandetti-Robin, Back & Body Chiropractic
Elspeth Cowell MSCh DpodM SRCh HCPC reg
William Hunter, Nuffield Health
Subscribe Today
Latest Issue

Be at the leading edge of sports injury management
Our international team of qualified experts (see above) spend hours poring over scores of technical journals and medical papers that even the most interested professionals don't have time to read.
For 17 years, we've helped hard-working physiotherapists and sports professionals like you, overwhelmed by the vast amount of new research, bring science to their treatment. Sports Injury Bulletin is the ideal resource for practitioners too busy to cull through all the monthly journals to find meaningful and applicable studies.
*includes 3 coaching manuals
Get Inspired
All the latest techniques and approaches


Sports Injury Bulletin brings together a worldwide panel of experts – including physiotherapists, doctors, researchers and sports scientists. Together we deliver everything you need to help your clients avoid – or recover as quickly as possible from – injuries.
We strip away the scientific jargon and deliver you easy-to-follow training exercises, nutrition tips, psychological strategies and recovery programmes and exercises in plain English.
